Today I am going to be talking about my all time favorite thing for fall...Plaid! I normally write about two or three things per post but I really feel as if plaid is something that should get its own post.
Okay, so I know a lot of people who stray away from plaids but I happen to love them. Plaids are a staple in my wardrobe. I think that most people who I know who stray away from plaids do so because they associate them with farmers and other people like that, but really, it has become appropriate for all of us non-farmers to wear plaid!
Plaids are making a comeback, finding themselves on runways this season!
So you might be asking yourself, how do I wear plaid? Well, I normally wear plaid with jeans and boots (either a flat black boot or the Ugg type of boots). For me wearing plaid is all about it looking effortless and comfortable. Plaid is so easy to wear that anyone, any shape and any size can pull it off.
Whenever I go shopping with friends and they ask about buying a piece that is plaid I always tell them to go for it! Plaid shirts are great for Autumn weather, they look cute one everyone and just really are a great way to ease yourself into the Fall season.
Another item that is plaid that I really like is the plaid dress. This might seem odd to some of you but you really have to give it a chance. Most women, in most cases that I have seen who wear plaid dresses tend to look like they are 12 years old, and none of us want that, right? So here are some tips on how to wear a plaid dress.
To wear a plaid dress appropriately it would be a good idea to accessorize, wear a belt or a solid colored scarf for example. Accessories like these are going to downplay the plaid and make you look more age appropriate. Another way to wear a plaid dress is to buy it in a more sophisticated cut and pairing it with tights and a nice pair of pumps. There are examples of both of these in the pictures below.
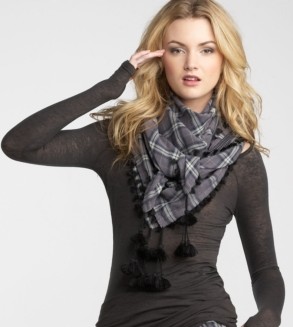
So I've talked about shirts and dresses and now I want to talk about plaid accessories! These can be a great way yo ease yourself into plaid if you aren'e someone who is comfortable with prints.
The very first thing that I would suggest you go out and get right now (regardless of if you love print or not) is a plaid scarf. I am really in love with the plaid scarf. During the cooler seasons I wear scarfs almost every day and I have a few of them that are plaid.
This in my opinion is the easiest way to wear plaid. There are so many ways to wear scarves and they flatter everyone, no matter your body type.
So another accessory that I love are purses. I have been seeing plaid purses everywhere lately, and they are so cute and so easy to find. My personal favorite is Coach, their plaids are just beautiful and in so many colors.
Another way to add plaid to your wardrobe is by buying shoes that have hints of plaid in them. I love this because you can wear a solid colored dress and then wear these shoes and add your print on your feet.
The last and final way to add plaid to your outfit is by getting it on your nails. This may sound odd but it looks very understated and beautiful if it's done the right way.
One last note, this is a plaid DON'T. Please do not ever wear more than one plaid item at a time. It really doesn't look good and you just look like you got swallowed by your grandmas quilt. So for example, do not wear a plaid dress and plaid shoes. Another example, never wear a plaid shirt and a plaid scarf, you get...right?
I really hope that this has inspired you to love plaid! Or at the very least, try it on and maybe start with baby steps, like a scarf or a purse. Just remember to have fun with it and remember my rules!
Until Next Time!
- xoxo